ひよっこ。

I want to…

phabricatorをインストールしてみた

Posted by hikaruworld : 2012 9月 15

コードレビューツール 6選 どれが最適?で紹介されていたphabricatorに素敵さを感じました。
Ubuntuだとインストールスクリプトが準備されているということで、さくっと?インストールしてみました。

基本的な流れは、こんな感じになりました。
1. ソースの取得と展開
2. 各種設定ファイルの定義
3. セットアップウィザードの実行
4. ログインアカウントの作成

構築した環境は、 lsb_release -aで確認すると以下の通り

No LSB modules are available.
Distributor ID: Ubuntu
Description: Ubuntu 12.04.1 LTS
Release: 12.04
Codename: precise

インストールしたphabricatorのhashはeaf7aedb05d01ffab4cceb1bf52cfa084c74d489でした。

なお、virtualbox上に構築されてるUbuntuなので該当のIPアドレスを192.168.56.101とします。

1.アプリケーションの取得とインストール

詳しくはこちらInstallation_Guideを参照しましょう。
今回は/opt/phabricator以下にインストールします。

sudo mkdir /opt/phabricator
sudo chown -R morizou:morizou phabricator/
cd /opt/phabricator
wget http://www.phabricator.com/rsrc/install/install_ubuntu.sh
chmod +x install_ubuntu.sh
./install_ubuntu.sh

以下の様に標準出力にメッセージが流れます。

PHABRICATOR UBUNTU INSTALL SCRIPT
This script will install Phabricator and all of its core dependencies.
Run it from the directory you want to install into.

Phabricator will be installed to: /opt/phabricator.
Press RETURN to continue, or ^C to cancel.

と確認されるのでEnterで。

Testing sudo…
Installing dependencies: git, apache, mysql, php…

パッケージリストを読み込んでいます… 完了

…省略…

35.8 MB のアーカイブを取得する必要があります。
この操作後に追加で 119 MB のディスク容量が消費されます。
続行しますか [Y/n]?

と聞かれるので当然YESで。apt-getとgit cloneで必要な依存モジュールがインストールされます。

取得:1 http://jp.archive.ubuntu.com/ubuntu/ precise/main apache2-mpm-prefork i386 2.2.22-1ubuntu1 [2,400 B]
取得:2 http://jp.archive.ubuntu.com/ubuntu/ precise/main libnet-daemon-perl all 0.48-1 [43.1 kB]

….省略…

Cloning into ‘libphutil’…
remote: Counting objects: 4717, done.
remote: Compressing objects: 100% (1821/1821), done.
remote: Total 4717 (delta 2887), reused 4575 (delta 2752)
Receiving objects: 100% (4717/4717), 1.12 MiB | 169 KiB/s, done.
Resolving deltas: 100% (2887/2887), done.
Cloning into ‘arcanist’…
remote: Counting objects: 6512, done.
remote: Compressing objects: 100% (2644/2644), done.
remote: Total 6512 (delta 4015), reused 6254 (delta 3763)
Receiving objects: 100% (6512/6512), 1.18 MiB | 212 KiB/s, done.
Resolving deltas: 100% (4015/4015), done.
Cloning into ‘phabricator’…
remote: Counting objects: 46594, done.
remote: Compressing objects: 100% (17230/17230), done.
remote: Total 46594 (delta 29339), reused 45607 (delta 28464)
Receiving objects: 100% (46594/46594), 8.07 MiB | 744 KiB/s, done.
Resolving deltas: 100% (29339/29339), done.
Submodule ‘externals/javelin’ (git://github.com/facebook/javelin.git) registered for path ‘externals/javelin’
Cloning into ‘externals/javelin’…
remote: Counting objects: 1814, done.
remote: Compressing objects: 100% (669/669), done.
remote: Total 1814 (delta 1131), reused 1782 (delta 1104)
Receiving objects: 100% (1814/1814), 546.50 KiB | 207 KiB/s, done.
Resolving deltas: 100% (1131/1131), done.
Submodule path ‘externals/javelin’: checked out ‘6ad17a59326690ed11c4b72c506a6218e438cad9’

Install probably worked mostly correctly. Continue with the ‘Configuration Guide’:

http://www.phabricator.com/docs/phabricator/article/Configuration_Guide.html

You can delete any php5-* stuff that’s left over in this directory if you want.

問題なくインストールされると上記の様にログが出力されます。
ちなみにディレクトリ的にはこんな感じになりました。

/opt/phabricator
├── arcanist
├── install_ubuntu.sh
├── libphutil
└── phabricator

注意事項:Proxyが原因でgit cloneに失敗する場合

通常プロキシ環境においてgit clone https://…が通っていても、host名が解決出来ずエラーになってしまいました。
スクリプト自体が、git://プロトコルで定義されている事、
https_proxyの環境設定が伝わらなかった事が原因だったので、
以下のようにスクリプトを修正しました

7a8,10
> export https_proxy=http://proxy.com:80
>
>
62c65
<   git clone git://github.com/facebook/libphutil.git
---
>   git clone https://github.com/facebook/libphutil.git
69c72
<   git clone git://github.com/facebook/arcanist.git
---
>   git clone https://github.com/facebook/arcanist.git
76c79
<   git clone git://github.com/facebook/phabricator.git
---
>   git clone https://github.com/facebook/phabricator.git
79a83,85
>
> sudo sed -i s/git:/https:/g phabricator/.gitmodules
> sudo sed -i s/git:/https:/g phabricator/.git/config

2.アプリケーションの設定

無事インストール?が終わったら、設定を行っていきます。
ここからの説明はConfiguration_Guideに書かれているのでその手順に従います。

2.1設定ファイルを作成

myconfig.conf.phpというファイルを新規に作成します。

mkdir -p /opt/phabricator/phabricator/conf/custom/
cd /opt/phabricator/phabricator/conf/custom/
touch myconfig.conf.php

ファイル設定に関しては設定ガイドのサンプルを修正します。
phabricator.base-urimysql.*関連の修正と、
メールを送信しない場合はmetamta.mail-adapterを新規に定義します。
というか、metamta.mail-adapterの設定しないとセットアップ中に失敗しますのでご注意を(詳細は下記参照)。

こんな感じに設定しています。

<?php

return array(

  // Important! This will put Phabricator into setup mode to help you
  // configure things.
  'phabricator.setup' => true,

  // This will be the base domain for your install, and must be configured.
  // Use "https://" if you have SSL. See below for some notes.
  'phabricator.base-uri' => 'http://192.168.56.101',

  // Connection information for MySQL.
  'mysql.host' => 'localhost',
  'mysql.user' => 'root',
  'mysql.pass' => 'mysqlrootpassword',

  // Basic email domain configuration.
  'metamta.default-address' => 'noreply@phabricator.example.com',
  'metamta.domain'          => 'phabricator.example.com',
  'metamta.mail-adapter'    => 'PhabricatorMailImplementationTestAdapter'

  // NOTE: Check default.conf.php for detailed explanations of all the
  // configuration options, including these.

) + phabricator_read_config_file('production');
?>

2.2. 環境変数の設定

PHABRICATOR_ENVの環境変数を設定が必要なので、.bashrcPHABRICATOR_ENV=custom/myconfigを追記しておきます。

echo "export PHABRICATOR_ENV=custom/myconfig" >> ~/.bashrc
source ~/.bashrc

2.3. Apache2の設定

PHPさんなので、apache2で起動設定を行います。
設定ガイドではVirtualHostで設定していますが、面倒なのでdefault(http://192.168.56.101/)で動くようにします。
/etc/apache2/sites-available/defaultを以下のように修正します。

<VirtualHost *:80>
        ServerAdmin webmaster@localhost

        ServerName localhost.com

        #DocumentRoot /var/www
        DocumentRoot /opt/phabricator/phabricator/webroot

        RewriteEngine on
        RewriteRule ^/rsrc/(.*)     -                       [L,QSA]
        RewriteRule ^/favicon.ico   -                       [L,QSA]
        RewriteRule ^(.*)$          /index.php?__path__=$1  [B,L,QSA]

        SetEnv PHABRICATOR_ENV custom/myconfig

        # 以下省略....

再起動します。

sudo /etc/init.d/apache2 restart

注意事項:rewirteがインストールされていない

起動時にrewriteを導入していないと、以下のエラーになります。

Invalid command ‘RewriteEngine’, perhaps misspelled or defined by a module not included in the server configuration
Action ‘configtest’ failed.
The Apache error log may have more information.
…fail!

以下のコマンドでインストールします。

sudo a2enmod rewrite

こんな感じでインストールされました。

Enabling module rewrite.
To activate the new configuration, you need to run:
service apache2 restart

3. Setupウィザードを実行

http://192.168.56.101/にアクセスして、Setupを行います。
色々設定される途中で、エラーが出るので修正していきましょう。

エラーが出ないように修正をして、以下のように表示されたらとりあえずOKです。

>>> SUCCESS! —————————————————————–

Congratulations! Your setup seems mostly correct, or at least fairly reasonable.

*** NEXT STEP ***
Edit your configuration file (conf/custom/myconfig.conf.php) and remove the ‘phabricator.setup’ line to finish installation.

修正が完了、myconfig.conf.phpのphabricator.setupfalseに設定しておきます。

注意事項:timezoneの設定

<<< *** FAILURE! *** >>>
Setup failure! Your configuration fails to specify a server timezone. Either set ‘date.timezone’ in your php.ini or ‘phabricator.timezone’ in your Phabricator configuration. See the PHP documentation for a list of supported timezones:

/etc/php5/apache2/php.initimezoneの設定もれなので追加してapacheを再起動します。

date.timezone = 'Asia/Tokyo'

注意事項:ドメインの問題

<<< *** FAILURE! *** >>>
You must host Phabricator on a domain that contains a dot (‘.’). The current domain, ‘localhost’, does not have a dot, so some browsers will not set cookies on it. For instance, ‘http://example.com/ is OK, but ‘http://example/&#8217; won’t work. If you are using localhost, create an entry in the hosts file like ‘127.0.0.1 example.com’, and access the localhost with ‘http://example.com/&#8217;.

phabricator.base-urihttp://localhostなどのようにドットを持たないURLを指定しているとエラーになってしまいます。
localhost.comなど.を含むURLにする必要があります。

# となるとlocalhostで単純に出来ないのでlocalhost.comとか作って/etc/hostsを弄ったりするはめに…

注意事項:SQLの更新

<<< *** FAILURE! *** >>>
Setup failure! You haven’t run ‘bin/storage upgrade’. See this article for instructions:

自分の環境では初期セットアップでも出た場合と出ない場合がありましたが…。
設定ガイドに従って以下を実行してstrageを初期化します。

prepro:/opt/phabricator/$ ./bin/storage upgrade

注意事項:メール設定

<<< *** FAILURE! *** >>>
Setup failure! You don’t have a ‘sendmail’ binary on this system but outbound email is configured to use sendmail. Install an MTA (like sendmail, qmail or postfix) or use a different outbound mail configuration. See this guide for configuring outbound email:

メール設定が行われていないときに発生します。
必要に応じて任意のメールサーバーを設定します。
ここではとりあえず無効化の設定を myconfig.config.phpに設定を行っています。
詳しくはConfiguring_Outbound_Emailを参考にしてください。

MySQLのタイムアウト設定

*** NOTE: Your MySQL connect timeout is very high (60 seconds). Consider reducing it
to 5 or below by setting ‘mysql.connect_timeout’ in your php.ini.

タイムアウトが長すぎると警告されているので5秒辺りにphp.iniを修正します。

mysql.connect_timeout = 5

注意事項:セットアップ完了で初期遷移後のエラー

This install of Phabricator is configured as ‘localhost.com’ but you are accessing it via ‘192.168.56.101’. Access Phabricator via the primary configured domain.

ドアクセス質得るドメインとmyconfig.config.php上で定義したphabricator.base-uriが違うとこのエラーが出ます。同じドメインに設定しておきましょう。

4.アカウントの作成

http://192.168.56.101/へ遷移すると、アカウントの入力を求められます。
phabricator自体はFaebookやGoogleへのOAuthをサポートしていますが、デフォルトではuserId/Passwordの認証のみになります。
管理者権限があればWEBからアカウントの制御を行えますが、初期ユーザはCLIで作成する必要があります。

prepro@/opt/phabricator/phabricator$ bin/accountadmin 

でウィザードが起動して新規ユーザを作成します。

アカウント関連に関してはConfiguring_Accounts_and_Registrationを参照してください。

以上で、環境構築は完了です。
これで起動して確認する事が可能ですが、次回はその他の設定を行います。

Posted in program | タグ: , , , | 2 Comments »

MeteorでSession.setしてもリアクティブ処理されなかった

Posted by hikaruworld : 2012 9月 13

Meteor0.4でSession#setで設定時のリアクティブ処理の伝搬がうまくいかないなぁと思ってソース確認してたら、
こんな処理になっていました。

//Session.js
//...
set: function (key, value) {
 var self = this;
 var old_value = self.keys[key];
 if (value === old_value)
    return;
//...

===でインスタンス比較して変更されていない場合は処理しない実装になってますね。
むぅ、これはセッション上にオブジェクトはやめとけてきな感じ?
わかるけど、わかるけど…。オブジェクト渡したいんですよ。

どうするか迷ったけど、undersocre.jsのcloneで回避するようにしました。微妙….

以上です。

Posted in program | タグ: | Leave a Comment »

SublimeText2のPackageControlをインストール(したらあいかわらずproxyでこけたでござる)

Posted by hikaruworld : 2012 9月 12

SublimeText2というのを最近よく聞くのでちょっと試してみました。
ダウンロードはこちらから。

Python製というのが素敵ですね。
Win/Mac/Linuxと一通り準備されていますが、今回はWindows7にDevBuild版のPortableVersionをインストールしています。

詳細な使い方やカスタマイズ方法はほかに譲るとして、
プラグインの管理で使うSublimePackageControlをを導入しようとしたちょっとはまったのでメモしておきます。

Sublime Package Controlのインストール

SublimeText2を起動し、View => Show Console でコンソールを立ち上げます。

以下のコマンドをコピーして(ワンライナーです)コンソールに貼り付けて実行します。

import urllib2,os; pf='Package Control.sublime-package';ipp=sublime.installed_packages_path(); os.makedirs(ipp) if not os.path.exists(ipp) else None; urllib2.install_opener(urllib2.build_opener(urllib2.ProxyHandler({}))); open(os.path.join(ipp,pf),'wb').write(urllib2.urlopen('http://sublime.wbond.net/'+pf.replace(' ','%20')).read()); print 'Please restart Sublime Text to finish installation'

するとこんなエラーになってしまいます。

Traceback (most recent call last):
  File "<string>", line 1, in <module>
  File ".\urllib2.py", line 126, in urlopen
  File ".\urllib2.py", line 391, in open
  File ".\urllib2.py", line 409, in _open
  File ".\urllib2.py", line 369, in _call_chain
  File ".\urllib2.py", line 1161, in http_open
  File ".\urllib2.py", line 1136, in do_open
urllib2.URLError: <urlopen error [Errno 11004] getaddrinfo failed>

proxyでこけてます。
というわけで、urlilb2.ProxyHandlerの設定をしてから実行します。
こんな感じ。

import urllib2,os; pf='Package Control.sublime-package';ipp=sublime.installed_packages_path(); os.makedirs(ipp) if not os.path.exists(ipp) else None; urllib2.install_opener(urllib2.build_opener(urllib2.ProxyHandler({'http': 'http://proxy.com:8080'}))); open(os.path.join(ipp,pf),'wb').write(urllib2.urlopen('http://sublime.wbond.net/'+pf.replace(' ','%20')).read()); print 'Please restart Sublime Text to finish installation'

これでインストールが無事完了するはずなので、SublimeText2を再起動します。

おまけ

WindowsではなくてMacで試していた時に終了ボタンを押してもアプリケーションが終了しないことがありました。
そういうときはConsoleを表示してexit()と実行してみます。

その他のパッケージのインストール

これでプラグインをインストールする環境は整ったので、好きなプラグインをインストールできる…と思ったら、
インストールしようとした瞬間にこんなエラーになります。

Package Control: There are no packages available for installation.

原因はこれのようです。
最新版にはまだマージされていないようなので、手でこの修正をマージします。

Preferences => Browse Package… でプラグインがインストールされるディレクトリを開きます。
Package Control => Package Control.pyを上記の修正に合わせて修正します。

あとはそのまま使えばOKです。

あ、当然ですが、
Preferences => Package Settings => Package Control => Settings – Default –
で、http_proxy/https_proxyの設定は行っておきましょう。

参考

Sublime Package Controlがプロキシ環境だとエラーになる

Posted in program | Leave a Comment »

Meteorで画面遷移を実装する(泥臭い感じ)

Posted by hikaruworld : 2012 9月 12

最近Meteorで遊んでいます。

簡単にプログラムできて楽しいのですが、
Meteorは基本的には画面遷移を持たない構成が前提になっているらしく、
画面遷移を実装するためには少し工夫する必要があります。

Meteorのテンプレート機能にはif文などの制御文を書く事が可能です。
今回はこの制御文とSessionを介したReactiveProggramingモデルを使って、
Sessionに状態を格納して画面遷移を制御します。

index.htmlに以下の様に定義します。

// index.html
<body>
    {{> state}}
</body>

<template name="state">
    {{#if state_is "login"}}{{> login}}{{/if}}     // LOGIN状態の場合
    {{#if state_is "main"}}{{> main{{/if}}       // MAIN状態の場合
</template>

<template name="login">
    <h3>ログイン</h3>
</template>

<template name="main">
    <h3>メイン画面</h3>
</template>

javascriptでstate_isの関数を定義します

// index.js
/** 引数に指定した状態とSessionに格納した状態が同じ場合にtrueを返す */
Template.state.state_is = function(state) {
    return Session.get("STATE") === state;
}

あとは、Sessionに状態を設定すると画面が遷移します。
デベロッパーツールなどのjavascriptコンソールでSession#setで値を設定してみます。

Session.set("STATE", "login");
Session.set("STATE", "main");

ちなみにmeteor.comにデプロイもしてみました。

ちなみにこちらのサイト(英語)が参考になりました。

以上です。

Posted in program | タグ: , | Leave a Comment »

meteorをhomebrewでインストールする

Posted by hikaruworld : 2012 9月 12

Meteor はcurlで簡単にインストールできるのですが、
Macだとhomebrewでインストールできると色々と楽です。

何か方法がないかなーと思って探していると、issues16を発見。
GistにFormulaが公開されていたので拝借します。

ここで公開されているバージョンは、0.3.8のため、0.4.0に修正しておきます。
sha1の修正も必要です。

# git clone https://gist.github.com/3072321
require 'formula'

class Meteor < Formula
  homepage 'http://www.meteor.com'
  url 'http://d3sqy0vbqsdhku.cloudfront.net/meteor-package-Darwin-x86_64-0.4.0.tar.gz'
  sha1 'eeddf0a529e6664e99cb10e8335389b53e95abde'

  def install
    libexec.install(Dir['{.*,*}'] - ['.', '..']) # includes dotfiles
    (bin+'meteor').write <<-EOS.undent
#!/bin/bash
exec "#{libexec}/bin/meteor" "$@"
EOS
  end

  def test
    system "#{bin}/meteor", '--version'
  end
end

自分のgithubにupしたので、tapでgithubに登録しておきます。

brew tap hikaruworld/local

あとは、インストールするだけでOK。

brew install meteor

以上です。

Posted in program | タグ: , | Leave a Comment »

vim+w3mでreStructuredTextの環境を構築する

Posted by hikaruworld : 2012 6月 10

reStructuredText便利です。はい。
文章を書くときは、これとsphinxで構成するケースが多いです。

ところで便利なreSTなんですが、出来上がりをリアルタイムで確認するようなモノがないのが残念なところです。
Windowsだとrsteditというエディタ&ビューアがあるのですが、
私の環境はMac or Ubuntuなので無理ぽ。
それと自分は、reSTの編集は基本vimですし。

という訳で、何かないかなーと思って探しているとrestviewというものを見つけました。
A ReStructuredText viewerと書いてあるようにシンプルなreSTのビューアのようです。

これとw3m(テキストブラウザ)を使ってvim上でreSTのリアルタイムプレビューできる環境が構築できたので、
忘れないようにログを残しておきます。

必要なもの

エディタとしてvim、ビューアとしてrestviewをバックグラウンドで動かしてw3mで結果の確認を行います。
vimはMacデフォルトの物を使用、
w3mはbrewから。

brew install w3m

restviewはpipでインストールします(要Python)

pip install restview

あと、vimからw3mを参照するのに、w3m.vimというプラグインがあるので導入しておきます。

restviewの起動

編集したいreSTファイルのカレントディレクトリで、

restview -l 9999 .

でrestviewを起動します。-lで任意のポートを指定できます。
これで、カレントディレクトリをrestviewが監視してくれ、
更新された場合にhttp://localhost:9999で変更内容が随時コンパイルしなくても確認できます。

vimの設定

.vimrcに保存時と監視時の設定を組み込みます。


function! RestWatch()
	" TODO バックエンドで起動する
    " !restview -l 9999 . &
    " TODO 事前にプロセスとwindow情報を確認する。今は固定
    " let restview_pid = !pgrep -n -f restview
    " echo !lsof -Fc -a -i -p restview_pid
    :W3mSplit http://localhost:9999
    :wincmd L
endfunction

function! RestW3mReload()
    :wincmd w
    :W3mReload
    :wincmd w
endfunction

command! -nargs=0 RestWatch call RestWatch()
command! -nargs=0 RestReload call RestW3mReload()

autocmd BufWritePost *.rst silent call RestW3mReload()

エラー処理などしていないので思いっきり雑ですが(汗….
# まぁ、その辺は後でやるとして

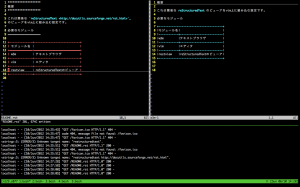
RestWatchでsplitでw3mを立ち上げてプレビュー画面を立ち上げます。
RestW3mReloadをautocmdに指定する事で、*.rstを保存したタイミングでw3mを再描画しています。

これで、viewで確認しつつvimで書く事が出来るようになりました。
毎回ブラウザ確認するのに比べたら随分快適です。

以上です。

Posted in program | タグ: , , | Leave a Comment »

vimでcoffeescriptの環境再構築したら機能が強化されててビビるなど

Posted by hikaruworld : 2012 6月 7

久しぶりにcoffeescriptを書こうと思いたち、
どうせだしvim-coffee-scriptを最新にしました。

そうしたら、以前からかなり機能が強化されていたのでメモしておきます。

Recompile on write

要するに保存したらコンパイルしてねという設定。

au BufWritePost *.coffee silent CoffeeMake! -cb | cwindow | redraw!

これで、.coffeeなファイルを保存すると、.coffeeと同じディレクトリに.jsなファイルが生成されます。
あと、–bareを有効にして、スコープを限定しないようにしてます。

Watch (live preview) mode

要するにcoffee-scriptを書きながら生成されるjavascriptを見ながら作業できる設定。
これは便利だし、習得が早くなりますね。
頻度が高いのでキーマップを設定しておきます。

nnoremap <Leader>w :CoffeeCompile watch vert<CR>

CoffeeLint: Lint your CoffeeScript

要するにlintの実行。要coffeelint
Quickfixとあわせて幸せになれます。

設定は特におこわなくてもCoffeeMakeの時にやってくれます。

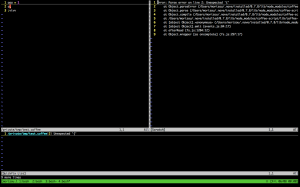
というわけで、大体こんな感じになりました。

以上です。

Posted in program | タグ: , | Leave a Comment »

vimでnodelintを有効化してQuickfixを活用する

Posted by hikaruworld : 2012 5月 3

最近触っていなかったnodeを触ろうと思って、vimの構成を少し弄っていました。
当時はjslintでやっていたvalidationを、nodelintでやってflymakeしよう思い
Vimでnode.jsの文法チェック(nodelint編)』を参考に設定を調整してたんですが、
ちょっとハマッたのでメモしておきます。

なお、以下のバージョンで構築しています。

OS MacOSX(SnowLeopard)
vim MacOSX(SnowLeopard)デフォルトの7.2.108
errormarker.vim Version 0.1.13
node 0.7.8
nodelint 0.6.1

errormarker.vimとnodelintの導入

とにかく、上記サイトに従ってerrormarker.vimとnodelintを導入します。
nodelintの設定まではここでは行いません(npm install -g nodelintまで)。
なお自環境との違いは、homebrewではなくてnaveベースなことです。

nodelintの設定変更

自分の確認したnodelint 0.6.1では、–reporterという引数でnodelintの出力形式が指定できるようです。

以下のコマンドでデフォルトで提供される出力形式が確認できます。

nodelint --list-reporters

以下、出力結果です。

Build-in reporters: 
* default: Default reporter
* idea: IDEA reporter
* textmate_full: Textmate full HTML reporter
* textmate_summary: Textmate full HTML reporter
* vim: VIM syntastic reporter
* xml: XML reporter

ご丁寧にvimの出力形式が準備されているのでありがたく使わせて頂きましょう。
ただ、ちょっとだけ出力形式が見づらいので修正します。

実際のvim用のreporterファイルは以下にあります。
$NODE_PATH/../node_modules/nodelint/lib/reporters/vim.js
変更内容は以下です。半角スペース入れて、文字列を一部切り詰めます。

41c41
<       str += file  + 'line ' + error.line +
---
>       str += file  + ' line ' + error.line +
43c43
<         ' Error: ' + error.reason + ' ' +
---
>         ' E: ' + error.reason + ' ' +

errormarkerの設定

基本的には参考サイトの通りですが、–reportersの設定を追加する事とerrorformatの設定を変更します。
あと、自分の場合は、$HOME/.vim/bundle/errormarker/ftplugin/javascript/flyquickfixmake.vimになります。

setlocal makeprg=$NODE_PATH/../../bin/nodelint\ --config\ $NODE_PATH/../node_modules/nodelint/config.js\ --reporter\ $NODE_PATH/../node_modules/nodelint/lib/reporters/vim.js\ %
" main.js line 2 column 1 E: ......
setlocal errorformat=%f\ line\ %l\ column\ %c\ %t:\ %m

if !exists("g:javascript_flyquickfixmake")
    let g:javascript_flyquickfixmake = 1
    au BufWritePost *.js silent make
endif

いくつか補足をば。
* makeprgの指定に関しては、naveを利用している都合上都度変更されるため、$NODE_PATHを基点に定義しています。
* –reporterに関しては既に記述した通りです。
* config.jsはインストール時のまま特に弄っていません(参考サイト通りに変更していません)。
* errorformatは–reporter vim.jsの出力形式にあわせています。
* make処理は一々表示して欲しくないのでsilentにしています。

.vimrcの設定

一部.vimrcの設定も変更しました。

" 保存時にerrormaker.vimでCUIの画面がぶれるので、いったん再描画する
autocmd QuickfixCmdPost make redraw!
" quickfixに対象が存在した場合に自動起動する用に設定
autocmd QuickfixCmdPost make if len(getqflist()) != 0 | copen | endif
" quickfixに対象が存在しなかった場合に自動で閉じるように設定
autocmd QuickfixCmdPost make if len(getqflist()) == 0 | cclose | endif

以上です。

参考にしたサイト

それマキ(それ今mackeeがやってるよ)
vimdoc-jar quickfix

おまけ

そういえば、:signが有効になんないんですよね。

E319: Sorry, the command is not available in this version

とか言って怒られますorz…

Posted in program | タグ: , , , | Leave a Comment »

bzr2.5に更新したら、bash-completionがエラーになっちまった

Posted by hikaruworld : 2012 5月 3

bzrのバージョンを2.5にupdateしたところ、bash_completion
エラーになってしまってちょっと困ってました。
導入した経緯は、ここを参照。

出力されるエラーはこんな感じです。

bash-3.2$ bzr stbzr: ERROR: exceptions.AttributeError: 'module' object has no attribute 'shlex_split_unicode'

Traceback (most recent call last):
  File "/usr/local/Cellar/bazaar/2.5.0/libexec/bzrlib/commands.py", line 920, in exception_to_return_code
    return the_callable(*args, **kwargs)
  File "/usr/local/Cellar/bazaar/2.5.0/libexec/bzrlib/commands.py", line 1131, in run_bzr
    ret = run(*run_argv)
  File "/usr/local/Cellar/bazaar/2.5.0/libexec/bzrlib/commands.py", line 673, in run_argv_aliases
    return self.run(**all_cmd_args)
  File "/usr/local/Cellar/bazaar/2.5.0/libexec/bzrlib/commands.py", line 695, in run
    return self._operation.run_simple(*args, **kwargs)
  File "/usr/local/Cellar/bazaar/2.5.0/libexec/bzrlib/cleanup.py", line 136, in run_simple
    self.cleanups, self.func, *args, **kwargs)
  File "/usr/local/Cellar/bazaar/2.5.0/libexec/bzrlib/cleanup.py", line 166, in _do_with_cleanups
    result = func(*args, **kwargs)
  File "/Users/hoge/.bazaar/plugins/bash_completion/__init__.py", line 62, in run
    bash_completion_function(sys.stdout, **kwargs)
  File "/Users/hoge/.bazaar/plugins/bash_completion/bashcomp.py", line 401, in bash_completion_function
    data = dc.collect()
  File "/Users/hoge/.bazaar/plugins/bash_completion/bashcomp.py", line 303, in collect
    self.aliases()
  File "/Users/hoge/.bazaar/plugins/bash_completion/bashcomp.py", line 317, in aliases
    for token in commands.shlex_split_unicode(expansion):
AttributeError: 'module' object has no attribute 'shlex_split_unicode'

bzr 2.5.0 on python 2.7.3 (Darwin-10.8.0-i386-64bit)
arguments: ['/usr/local/bin/bzr', 'bash-completion']
plugins: bash_completion[1.2.1dev], bzrtools[2.4.1], cd[unknown],
    changelog_merge[2.5.0], colo[0.3.1dev], difftools[0.91.0],
    extmerge[unknown], hello_world[1.2.3dev4], launchpad[2.5.0],
    netrc_credential_store[2.5.0], news_merge[2.5.0], po_merge[2.5.0],
    qbzr[0.21.0dev2], rewrite_interactive[unknown], vimdiff[unknown],
    weave_fmt[2.5.0], xmloutput[0.8.8]
encoding: 'utf-8', fsenc: 'utf-8', lang: 'ja_JP.UTF-8'

shlex_split_unicodeがないって言われているみたいなんだけど、bzrのソースコードを覗いたところ、
確かになくなってしまっています。
log見たけど、2.2辺りで非推奨になってrev6030で消えてしまったみたいです。

ただ、対象の関数が行っている処理自体は大した事なくて、cmdlineモジュールに委譲しているだけでした。

def shlex_split_unicode(unsplit):
    return cmdline.split(unsplit)

という訳で、以下の用にbash_completionを修正。

=== modified file 'bashcomp.py'
--- bashcomp.py	2010-05-29 08:42:48 +0000
+++ bashcomp.py	2012-05-03 12:51:03 +0000
@@ -24,6 +24,7 @@
     help_topics,
     option,
     plugin,
+    cmdline,
 )
 import bzrlib
 import re
@@ -314,7 +315,7 @@
 
     def aliases(self):
         for alias, expansion in config.GlobalConfig().get_aliases().iteritems():
-            for token in commands.shlex_split_unicode(expansion):
+            for token in cmdline.split(expansion):
                 if not token.startswith("-"):
                     self.user_aliases.setdefault(token, set()).add(alias)
                     break

これでOKでした。
以上です。

Posted in program | タグ: , | Leave a Comment »

JIRAのプラグインマネージャーをプロキシ経由で有効にする

Posted by hikaruworld : 2012 4月 14

JIRAというよりGreenHooperを試してみたくて、
ちょっとJIRAインストールしていました。

インストール自体は簡単だったんですが、
色々めんどくさいですね試用するだけでも。
ダウンロード先まで迷ってしまいました。

で、本題。

GreenHooperのインストールはJIRAの管理メニューから
プラグインマネージャーというものを利用して行います。

ただし、このプラグインマネージャー、
自分の環境だとproxy経由で接続しており、そのせいでプラグインサイトに接続できません。
プロキシ設定くらいならJIRA管理メニューで設定できんじゃね?と思ったら見つかりません。
ドキュメントに書いてあるかな?と思ったんですが見当たりません。

困ったなーと思いつつ、
JavaでTomcatだしなと思ってcatalina.shでJAVA_OPTSでプロキシ設定をしてみました。
こんな感じの設定をcatalina.shの冒頭に設定します。

JAVA_OPTS="$JAVA_OPTS -Dhttp.proxyHost=ホスト名 -Dhttp.proxyPort=ポート番号 -Dhttp.nonProxyHosts=プロキシを通さないURL"

そうすると無事プラグインマネージャーからGreenHooperをインストールできました。
多分ちゃんとGUIのどこかで設定できるとおもうんですけども….
以上です。

Posted in program | タグ: , , | Leave a Comment »